Thursday, December 31, 2009

Countertops

The countertops are in! We actualy have three different materials, but this was not a complete loss of strategic function.

Laminate is the least expensive option, so it was an obvious choice for our basement project. Besides, it's easy to care for. But so many laminate designs look cheap and we are not doing a retro thing so don't really want space-age amoeba designs or flecks of gold. We also don't think much of laminate trying to look like stone because it really never does. And the flat colours look, well, flat. We thought we might tire of something that was bright or trendy, or that it would look dated soon.
One design caught our eye, though. In general we are trying to keep to natural materials (wood, glass, metal) throughout the space, so finding a laminate that looked like grass was interesting. It has just enough pattern to avoid looking flat, and a colour ways that works quite well with fir cabinets and sage green walls. As the laundry and bar kitchen areas can be seen from each other, this choice ties them together without being 'in your face' about it as the pattern can only really be seen when up close, and from a distance it looks quite different. It's a bit of a gamble, having chosen it from one small sample piece, but now that it's in place, we are happy to not be dismayed by it and are looking forward to seeing it with everything else in place.
We weren't as keen to use laminate for the bathroom vanities. On our research roadtrips we were quite excited to find a stoneworks company that charged only the labour for working small pieces that are offcuts from other jobs, with the material itself in essence being 'free'. Our two vanities required a realtively small amount of countertop, which makes real stone not much more than laminate in cost and ever so much nicer.

The basement bathroom countertop is granite, and quite an eyecatcher. There are sparkly bits that we hope will work well on our prospective silver wall idea. And there was enough material to do a back and side splash for only an extra $50.
Our main floor bathroom, the "Hollywood Bathroom" deserves something suitably glamorous so marble was the obvious choice. We like the idea of black and white to complement the flooring and provide more drama than those marbles that include browns and others colours. The piece we found to work with our oddly shapped, skinny vanity was cut with care to highlight the pattern, with the sink to go into the part that was mostly white.

Wednesday, December 30, 2009

mid-distance flushing

The toilet has been installed in the new lower level bathroom. It's a basic but good quality unit - a Toto Eco-drake - nothing fancy but one that's relatively good on water usage and also on the budget, and Toto is still regarded as a leader in loos.

All very good, except for the fact that you could drive a truck between the back of the tank and the wall. Well, I exaggerate. Maybe a Hotwheels truck, or another such item that is 3 1/2" wide, which is not too wide for a truck but a bit too wide for the optimum gap between tank and wall.

Our first question was, did the wrong toilet get delivered? Once the answer to that came back (no), the next question is what do we do about it. Obviously an error was made either in the roughing in or in the placement the wall. The toilet itself was chosen (with plumber's approval) before the demo started so it's not the toilet's fault (poor toilet - all it does is offer daily relief to the masses and it gets dumped on; there, there, it's not your fault).
What to do? Change Mohammed or the mountain? Can we get another toilet that will bridge the gap better? Will a 14" do (ours is a more standard 12")? What about an all-in-one, which we had coveted at the outset but the budget said no? Or do we change the wall itself somehow? It's not possible to extend the granite countertop over the tank as a shelf because there was not enough material in the chosen slab. A single floating shelf of stone or wood might look like it's hiding an error so perhaps we a few would make more of a statement. Or we could do something to the wall itself, like build it out as a pilaster (thanks to Eric for expanding our vocabulary and architectural references).
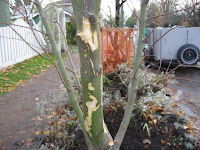
No, he didn't mean this kind of pilaster! My word, that's a bit grand isn't it? He means this kind of pilaster:
It could be a single column, or include niches, for pictures or photographs. Perhaps both, a pilaster with shelves inserted in the niches. We have some of the old fir beam left over from building the mantle which would tie in materials already used in the rest of the space. All we know is whatever solution is found it will not be on our dime.

Looks like a summit meeting on the first working day of the new year is needed. Eric has flown here at great expense (ok, he was already doing that) and will offer his design expertise to coincide with the contractors' and plumbers' individual expertises, and our refereeing and final word. Watch this space!

Tuesday, December 22, 2009

pre-holiday meal

It took us a while to learn this lesson, but now we know how to get a critical mass of workers at the house making our project the priority - serve them lunch! We prepared a big lunch of ham, cabbage rolls, vegetables and salad, and Christmas baking as a way to say thanks for all the hard work for anyone who happened to be working on the Tuesday before Christmas. Well, the place was awash with workers - all banging and sawing and working away! We had the cabinet makers and the countertop installers as well as the regular team and our head contractor. The electrician even showed up, even though electrical work was not on the agenda! One fellow came over in his lunch break from another project. In all, we had about 15 people eating in shifts.
One thing we had anticipated was putting lunch out a little later than the guys are usually used to eating - that way we got maximum work done before the food kicked in!

Wednesday, December 16, 2009

chim, chim, cheroo

Despite the illusions of grandeur this project seems to be taking on (!!!??!!), we really wanted to keep as much of the original character of the lower level of our house as possible. Moving the heating and hot water systems to an outside wall meant our old chimney was exposed and in a prime part of the house to highlight. Of course it's still in use, as we have a wood burning fireplace up stairs, but downstairs we declined the offer to cover it up, or even to paint it. The pinky, reddy, grey-y bricks are attractive, and go well with the sage green walls and white trim and dark oak floor.

But it wasn't pristine. For one thing the mortar in various parts had turned to sand and was escaping (much like our bank balance of late!), and the hole that had presumably allowed the original oil furnace to be attached to the flue had once upon a time been patched with bricks of a different hue. There was also cement patching that covered the top part, and there was another hole on the side where our previous furnace had been attached.
That hole isn't a problem , as it will be covered with a cabinet (yet to be installed) but the rest of it was not as attractive or as safe as it needed to be.
George to the rescue! Once bricks that vaguely matched the colour had been sourced (no small feat and on that took a long time and many rejected possibles) George slowly and carefully cleaned and repatched and remortared it until it now looks as good as an 80 year old workaday chimney can look.

Sunday, December 13, 2009

old to new

See that beam running along up there? The one on the right of the post? It's a long, substantial bit of fir that's been supporting the north half of this house for over 80 years. Because the city dictated it was too low to be allowed when we started the renovation, we replaced it with an I beam raisied up to the same level as the joists, which added several inches of height to our new space.

But what to do with the removed beam?

It's a lovely piece of old wood for one thing, and connected to the house historically and (for us) sentimentally.
So when we decided to have a fireplace with a mantle, it was easy to choose the material for the mantle.

Cut into the right length, and finished appropriately, our beloved beam is now back in its rightful place as a visible element of the house, although this time its allowed to be decorative instead of purely functional.

We should all be so lucky in our old age.

Friday, December 11, 2009

when is a drain not a drain?

When it's a layered salad.

In the olden days of yore, you dug a deep trench around your house, or maybe only along two sides, and placed a series of thick ceramic pipes along it. Then you covered it with soil, and maybe, if you were really keen, connected the eavestrough to a downspout and then to the pipes. That was it. Bob's your uncle.

Over time, these ceramic pipes fill wtih soil, whcih means they either have to be dug up and emptied and relaid, or dug up, removed and replaced. Why use something again that worked for 80 years? Since modern materials have made life easier, we have also made it more complex. Now when you want to do a drain properly, here's the recipe.
First you dig a trench at least 2 feet deep around all four side of your house. (That's a lot of digging.)

Then you pressure wash the house foundation and fix any cement aberrations that need repairing before smearing the whole thing with a thick. goopy, smelly black substance that smells like creosote (perhaps it is creosote, I don't know, I only watch this thing unfold). This black stuff must dry and in the winter this can take a few days.
Then you line your trench with a few inches of gravel before lying lengths of perforated plastic pipe. This is pipe with holes along it so that all ground water can enter the pipe and move along it, through it and down it, or up and over it.
Top with more gravel, and then a layer of landscape cloth, then more gravel. 
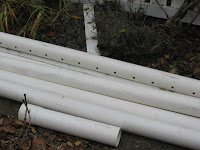
See waht I mean? Doesn't this remind you of those ghastly layered salads you used to find a church socials and high school fundraising dinners?

Now you are ready for the dimple wall, a thick plastic sheet with, yes, dimples, that is fixed into place. Another pipe is laid on top of this, but this one is holeless. These pipes, by the way, connect to the downspouts so that all water entering them is moved along and then away from your house entirely - shown off your property like some angry father with a lovestruck youth singing badly under his daughter's window, except the kid gets the window wrong and instead gets caught singing love songs to the girl's grandmother who took two hours to get to sleep in the first place and is now hopping mad at being woken up which infuriates her son, the father of the intended recipient of the warbled arias.

But I digress.

More gravel is placed over this second pipe, making the top now level with the surface and good to go on its own or ready for paving stones, cement pads, or whatever.

We decided that wasn't quite enough of a production (now that we know we don't in fact need a new sump and feeling the need for something to fill the void) so agreed to include a 1 foot wide line of gravel along the north side of the house, separating the house from the garden, with a line of pressure treated wood separating the gravel from the soil.

Thursday, December 3, 2009

A Man's Home

is His Castle, so they say.

(and that goes for A Woman too)

Well, we're not able to stretch to turrets or dungeons, but we do have a moat

No easy means of entry


except via a drawbridge. And we even have hay for the horses. That last delivery had us stymied. Hay? What on earth is that for?

Yesterday we had a wall of black, stinky tar-like substance put on the exposed and powerwashed foundation to act as waterproofing before the tile and rock go into place. It has to dry, and at this time of year, even on gloriously sunny days like today (hurrah!), that takes more than a day. With the high water table we have a bit of an oil slick that needs soaking up. Thus the hay.

Tuesday, December 1, 2009

November was the cruellest month

Sorry TS Eliot - maybe April is the right answer most years, but this year it's November hands down. And to press its suit, the last day of November dealt another cruel blow.

It all started last week.....
See that round cement thing by the fance, the cylinder that sits about 90% on our property?
When asked where our sump was, that's what we pointed to. However, we were told by our contractors that after they checked it out, no it is not our sump. It is our neighbour's sump.

"Are you sure?"
"Yes."

"But how come it's mostly on our property?"

"Don't know. Maybe the property line wasn't known when it was put in."

"The next door house was built in 1994 and the fence was put in immediately afterwards - wouldn't it have been sorted out then?"

"Don't know. All we know is it's not your sumnp."

"We always thought it was our sump. You're absolutely sure?"

"Yes, sorry, but it looks like we will have to add putting in a new sump to the drain job. "

"And what does that mean besides more $?"

"We will have to take apart your fence, move all plants that are in the way and dig a 7 foot deep trench between the house and the city line to join it all up."

Sigh....

Stage directions - days of rain follow. Homeowner brings out cookies she made one day after feeling sorry for men digging in mud. Plants moved, not without some damage. Garden a mess.


Flash forward to November 30, in the afternoon, rain has subsided.

Homeowner hears a knock.

"Yes?"

"Umm, you know that sump?"

"You mean the one that's not ours or the new one that's sitting on the boulevard along with a pile of soil waiting to go in once you've finished exacvating?"
"The first one."

"Yes? What about it?"

"Well, it turns out it is your sump after all."

(Dramatic pause)

"You mean that our garden is destroyed, plants were moved and damaged, men sweated and froze working in mud for days, and it was all for nothing?"

(Exit contractor, pursued by a bear.)

That last line is only wishful thinking. Unfortunately.